
As I prepare to paint over my Benjamin Moore Metallic glaze painted hallway (BM Studio Finishes Metallic Glaze in Veil Cream PT-370,) I thought I would share my experience with the paint for other people out there.

I actually love the metallic paint, it just didn’t work well in the space we tried to use it. It looks more metallic in person than these pictures, but does live up to it’s “subtle” claim, which is nice. The main reason we’re getting rid of it (besides the fact I didn’t love the color next to the color of our adjoining foyer) is that the walls in our hallway have 1) a fair amount of texture on them and 2) are old, have been poorly patched/poorly painted/etc many times. The metallic paint highlighted every single imperfection in the walls. I think for it to look best you have to start with very smooth walls, or want to highlight all your walls’ imperfections (not a bad thing necessarily, as long as it’s purposeful.)
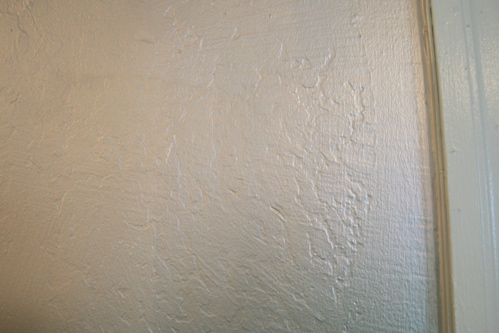
The second biggest problem was the poor coverage. We painted just the glaze over white(ish) walls. We were painting a hallway with three walls – not a large space. After going through 3 quarts (at about $25 a quart) we still needed more paint. At this point we decided to stop, but I know we would have needed at least another full quart, and I suspect even more than that. If I was going to do it again (which I might, in a house with smoother walls) what I would do first is have a flat latex paint mixed in the same color as the glaze (in our case, Veil Cream,) get a good coat or two of that on, and then the glaze over it. I think if we had done this it would have saved a lot of time, frustration, and probably money.
Hopefully someone else will learn from our experience, as it is really beautiful paint, and part of me is very sad to be losing my silver hallway. And sad to be losing the many hours I’ve spent painting and the many dollars I’ve spent at BM.

there was a post on the domino message boards a few months ago where a bunch of people wrote about their awful experiences with the metallic line. it seems like no one is having luck with this stuff, which is a shame. it’s so beautiful. in theory, at least.
do you think a darker color would work? i bought a beautiful dark blue gray (ralph lauren) from home depot for $5. I thought it could look really pretty on one wall as a highlight for black and white photos in black frames with white mats.
Did you ever use the dark blue gray metallic paint? Just curious because I am looking for some ideas. Like the idea of metallic paint but am not sure it will look great. Thanks for your input.
I used Martha Stewart metallic paint on stucco’d walls and it looked fantastic but as soon as we used it on smooth walls what a disaster. You have to like the fact that you will see the brush strokes or roller marks, its virtually impossible to get a perfectly painted wall with no streaks when using any type of metallic paint. If you are painting a small area it is possible but not entire walls. It’s best to buy sample pots and try it out, let it dry and see if you like the look but if you want a perfect looking paint job then metallic paint is not for you, regardless of colour.
hey Heidi,
you know, I’m not sure. I think the key with the metallic paints is to paint a similar flat color on the walls first, and then the metallic glaze. The glaze on white though just is way too labor intensive. Really, I think for me to get it perfect it would have taken at least five coats.
Dark blue sounds beautiful, let me know how it works out!
Powder Room Progress - (Though it doesn’t look like it) » Becoming Home
hallway redux « A Browner Brown
I’ve used this for strie projects which have been great and have seen it rolled on ceilings- not great. it’s impossible not to get roller flashing. I’m thinking of spraying this on a ceiling for a client- any suggestions???
yes, it HAS to be sprayed. I sprayed it on cream ceiling & it took 8 coats. It is amazing but expensive.
If you use the right base coat color, I don’t think you would need so many coats but this depends on the color you want…
I just painted my ceiling with the pearl metallic paint, and the roller marks are driving me nuts… Has anyone tried to spray it on, and if so how does that work…
I recently used the metallic glazes for a project in my bedroom. You can see the results here.
http://silenceoftheclams.com/blog/archives/179
Your hallway doesn’t look bad. I was thinking of using a metallic glaze in a dining nook, only on the ceiling. I too have plaster walls, poorly patched, 30’s home and has been through a few earthquakes. I will be painting it a light gray from Lowe’s (mistint) and I want to use a pewter glaze on the ceiling only. It’s coved. I’m worried because one wall is just windows. This will def. show imperfections. Direct sunlight isn’t kind to any painting. Anyways, I want to know how you applied the metallic, with rollers? At least from the pics the application looks really smooth. I thought about brushing it on and trying to make it look messy. Thanks:)
Hi Elizabeth! Here’s some opposite experience with Ben Moore Metallics (5 diff colors!): Your comments are incredibly helpful and I noted when I painted with these metallic colors. Your color and texture relies on the base coat COLOR– I used darker metallic on “flaws” a green blue, just amazing (adds a depth, etc).(If you look at Ben Moore latest samples for this paint they are textured!). The gold was amazing, and I used a red and orange basecoat (prepare to use a color you’d never use on your walls or anything else) and it’s the most beautiful effect you’ve ever seen. Seriously. Friend lives in high and mod Jersey City apartment (Hudson, Statue of Lib, Manhattan uber skyline) and the management brings people in to view possibility and transformation (I did have the luck of using an unemployed friend Pro Faux painter).
Keep sharing your knowledge and had to share mine because as I recommend to a friend to use these, I want her to read your blog!
Tina
Tina, what do you mean by flaws – I’m new to this sort of painting, and am really interested in “depth.” What combo worked for you? It sounds like there was metallic on top of green over orange basecoat or am I misunderstanding?
No, I’m not being very clear– To make metallics work, and believe me, they can work even better than the samples, it’s all about the base coat. I’ve used, separately, green; blue; gold; and copper (with burnt umber base — haven’t seen, last thing I gave painters with sample and friend emailed me photos — but looks like I thought it would!) If you want a bright gold metallic for instance, yes use a gold base coat BUT if you want to warm and red and “glowing” gold, use almost an orange base coat– not a color you would normally want to see on anything! If there are “flaws” on your wall, just like the plaster “pock marks” in the pink photo, you can use these to your advantage by adding several colors to your base coat. This base coat of many diff colors will go on uniform — but in a sense distract the eye from seeing the difference in texture — you are just seeing differences in color. You can — and should try — to create a uniform textured base coat of color, that is brighter than the metallic cover paint you are putting on it. Using a roller with a large nap on it is helpful because that will create the “texture” for the metallic to reflect from. I hope this makes sense and doesn’t make it more confusing!
Hi Tina, I came across your post from 2010 regarding the Ben Moore metallic paints! I am starting a project of painting metallic in my master bedroom. I saw a wall in their brochure and fell in love with it. It says to use Ashley Gray as base coat. Then apply Wrought iron and Bronze 61. Then do the combing horizontally and vertically to achieve a look of a linen. Now does this mean I first do a coat of Ashley gray as base, let it dry and then wrought iron and then the Bronze ? Or mix the wrought iron and bronze and do it like that? I am lost..
Im actually in middle of doing my house and chose this metallic look for my living room. I hope it comes out nice but i like the color you chose which color is that?
My friends and I have had a lot of luck with the Ralph Lauren Metallic line which is also more inexpensive than the Benjamin Moore line.
Yu are right, the walls have to be smooth. I used this on my ceiling, which was very smooth. It took 7-8 coats to get the look I wanted. It was a lot but such a great look!
I wished I came across your site sooner. We are almost done with our house project. We build our own house without help of builder or designer so I have been so confused and indecisive the entire time. We texture the whole house with soft hand trowel textures. I wanted to keep them white and it looks nice with soft texture and white but my fiancé think white is too plain so we did the metallic silver color. I agree that it would look much nicer if the walls are smooth, the textures are even but I still think it would look better on smooth walls. When my walls are white the texture look soft and nice, the silver color shows every single texture and it looks odd bc its not really modern and not really traditional now:)
Just a follow up to some of the comments already posted.
My husband works for a Ben Moore dealer in Washington DC and has fielded many questions about the Studio Metallic paint. I have heard him remark many times about how contractors say it can be difficult to work with but if the right tools are used the effect can be striking.
First and foremost … as some have already said, a basecoat color MUST be used. Ben Moore has supplied dealers with a list of colors that work well with each of the colors in the Studio Metallics palette. Attempting to apply any of the colors over a white base is a recipe for disaster.
Second … USE THE RIGHT TOOLS! There is a roller cover that should be recommended to each customer when they buy the paint (this applies to the Ralph Lauren metallic paint as well). Wooster has a roller called Polar Bear. It looks like a very loosely woven terry cloth applied to a roller cover. The cover comes in a 4″ and a 9″ version and you will need both. These paints are NOT applied with a brush; roller only. When there is an area such as between a door trim and a wall where there simply isn’t enough room to get a roller cover in, a brush can be used. The finish will not look like the rest of the walls but areas such as these are usually hidden anyway.
Third … work in small sections as the paint will start to set up fairly quickly.
Now, I am a rank novice when it comes to painting so my experience with this paint in a bathroom might serve as a guide. (hubby thought I was mad as a hatter when I told him I wanted to use the metallic) I bought the following items:
Wooster:
Polar Bear 9″ cover R236
Polar Bear 4 1/2″ cover RR312-4 1/2″
Jumbo-Koter Flip Frame RR323 (for the RR312)
Magic Cage 9″ Frame (don’t remember the number)
Gallon of PT-280 Icy Mist Studio Metallic
(WAY TOO MUCH PAINT!) Two quarts would have done the trick in this small bathroom.
Hubby brought home an oops paint in a gray/blue color for a basecoat rather than the recommended color for PT-280.
I painted the room with two coats of the base in what I figured was the “normal” way of painting. I found directions online and followed them.
I started painting the metallic paint with the 4 1/2″ roller cover for the edges (top of wall at the ceiling, bottom of wall at the tile line, around door frame and in the wall corners) Here’s where I made my first mistake. The Flip Frame can be a little difficult to keep an even pressure across the whole length of the roller and I found that I was leaving a glop at one side of every pass of the roller. I cured this by backing off the pressure and lightly rolling over the gloppy line to blend it in. The second mistake I made was the decision to paint the whole bathroom using the small roller cover.
The directions say that uniformity of the finish will not occur until an overnight drying time has passed. When I looked at my work the next morning, I wasn’t super impressed. This paint drys to a satiny sheen and shows every imperfection in the wall but that wasn’t my issue … I had streaks where I had applied too much paint. When hubby looked at it, he said I should have used the small roller to get the edges as previously listed and filled in the larger expanses with the larger roller. That means I’d have had two wet rollers going a the same time but the larger roller would provide better control. I did that and the following morning, the job was satisfactory … which means I had a uniform metallic color on my walls.
So. Here is what I learned. In addition to the three cautions listed above, use the small roller to “outline” (hubby calls it “cutting in”) the top, bottom, and corners of the wall and around any window/door frames. Only paint opposing walls and wait for them to dry. (This will add to the total time to complete the job, but you will not mess up the wet paint on the adjacent wall when you outline the new wall) You will be applying paint in different directions when you outline the walls so make sure that you run back over those sections with the large roller when you fill in the large portions. If you don’t do this, you will be able to clearly see where you outlined the wall. I was in a small bathroom so drying paint wasn’t a problem but I could see where it would be if you are doing a large wall say in a bedroom. In that case, I would say start outlining in one corner and a small portion of the top and bottom of the walls. When you have filled that section in, repeat until you have painted to the next corner of the room. Go to the opposing wall and repeat the process. Let both walls dry for a number of hours before tackling the remaining two (or more) walls.
Sorry for the length, but I wanted people to know that applying metallic paint isn’t ridiculously difficult. If I can do it you can too. I can’t imagine the Ralph Lauren metallic being all that different. I will say that RL has MUCH BETTER DIRECTIONS on their website. Benjamin Moore should learn a lesson from that.
I only wish I had taken pictures during the process that I could share.
Good luck and if you have a question, I will happily attempt to give you an answer.
Christie
15 years ago I used Ralph Lauren metallics and mixed them with my own clear glaze. (I’m thinking the newer products are much improved). They looked great over textured surfaces but not surfaces with bad patching and repairs. If you want to highlight a horrible surface, use metallic…nothing uglier. (No one wants that).
If you want a even metallic surface-use a sprayer. If you want some heavy duty control use silver or gold leaf but so much work! Great for powder rooms or dramatic hallways). If you want to layer a glaze over a base coat, and you don’t mind multi directional random brush strokes, roll glaze on a small area and lightly brush it out using a corona staining brush…keep a wet edge. To me it’s no different than working with non metallic glazes. Best to use a partner for major surfaces. I used to add flotral to increase my open time, but I’m not sure if that would still work with newer metallic products.
I saw a lovely bathroom with stenciled faux bois using metallic glaze for the stencil. Subtle and lovely. Likely, the best use of metallics is seen in stenciling.
When ive wanted to use metallics on expansive ceilings, I’ve opted for high gloss finishes in heavily pigmented colors. You get incredible shine and bounce but you don’t need to deal with the complication metallic brings to the project.
I got this website from my friend who informed me on the topic of this site
and now this time I am visiting this website and reading very informative articles here.
this is- hands down- the worst paint ive ever used. 7 coats? who are we kidding? i love that the specs sheet for the paint says “easy to apply”. i am a professional scenic painter and interior decorator and i have never had as much trouble with a paint as i did with this product. i primed, put on 2 base coats and i am on coat number 7 without a quality looking finish. i am embarrassed when i discuss the project with my client. we are looking for ways to make the project tolerable- i don’t see how more coats is the answer- and that’s all Benjamin Moore has to say for themselves.
On the scale of paints… Benjamin Moore is on the low. Not surprised to hear that coverage didn’t go well.
That’s why you leave it to the pros.